


Adding Numbers to Headings and Hiding them in Table of Content
In some themes that support automatic or semi-automatic Table of Content(next we will briefly describe ToC), the headings in the ToC take data from the two-level <h2> and <h3> heading tags with automatic numbering for each sub-heading.
The problem is that sometimes authors also add numbers to the sub-headings in their articles, this causes duplicate numbers to appear in the ToC. A lot of people are asking how to fix this, so we did a little trick using CSS code.
1. Adding CSS
.pS .h::before{content:attr(data-text)} Above is the CSS code that you must add to your blog, you can add it right before ]]></b:skin> or before /*]]>*/</style> code for AMP (Accelerated Mobile Pages) version users.
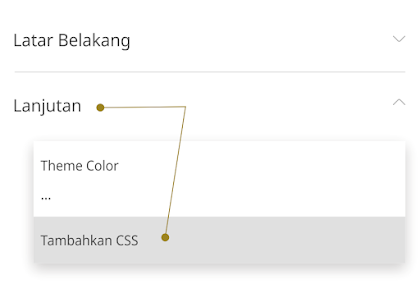
The easiest way to add CSS is through the Blogger theme designer:
- On Blogger dashboard, Click Themes > Customize
- click Advanced tab,
- click on 'Theme Color' dropdown menu
- scroll down until you find 'Add CSS' menu

- fill in CSS code in the column provided then click Save
In order for the CSS code to work, please edit your heading tag to be like this:
<h2>Title_here</h2>
<h2 class='h' data-text='1. '>Title_here</h2>
Change the number in data-text attribute according to the order of heading tags.
Remove Description at the Bottom of Post Title
In post page the search description will appear just below the article title, this applies to all themes. However you can still delete it, please follow the method below:
- On the Blogger dashboard, clickThemes
- Click icon on the Customize button
- Click Edit HTML, you will be directed to the editing page.
- Find the code below, you can delete or disable it by adding a comment tag
<!-- --><!-- Post Description -->
<div class='pD'><data:blog.metaDescription/></div><!-- Post Description -->
<!-- <div class='pD'><data:blog.metaDescription/></div> -->
Disabling Subtitles in Certain Paragraphs
In certain condition, you may want that some paragraphs in your article cannot be translated using Google Translate or other translation tools.
To do that, you can add class='notranslate' in paragraphs that you don't want to translate, for example:
<p>Neque porro quisquam est qui dolorem ipsum quia dolor sit amet, consectetur, adipisci velit...</p>
<p class='notranslate'>Neque porro quisquam est qui dolorem ipsum quia dolor sit amet, consectetur, adipisci velit...</p>
Add Google Analytics
You can directly add Analytics ID via Blogger settings without needing to edit blog theme HTML. In this theme already installed Google Analytics script which will only be active if you add Analytics ID, so this will not burden your blog.
- On Blogger dashboard, select Settings menu,
- in the first column you will find the Google Analytics Property ID,
- click theat link, a pop-up menu will appear containing a column to write down the Analytics ID,
- Paste your Analytics ID code in that column,
- click Save.
This guide also applies to the AMP (Accelerated Mobile Pages) version
Pop-up Comment Settings
We provide 3 alternative styles for Blogger comments, you can choose to keep the floating style or use a simple view.
To disable the floating comment feature, please find and delete or disable the tag below by adding comment <!-- and --> tags.
<!--[ Delete tag below to disable Pop-up comments ]-->
<b:class name='cmBr fixL'/>
<!--[ Delete tag below to disable Pop-up comments ]-->
<!--<b:class name='cmBr fixL'/>--> You can also use a simple comment view without the show/hide button by disabling the following tag:
<!--[ Delete tag below to disable show/hide comment ]-->
<b:include cond='data:post.allowComments' name='post-commentButton'/>
<!--[ Delete tag below to disable show/hide comment ]-->
<!--<b:include cond='data:post.allowComments' name='post-commentButton'/>--> Adding Comments on Static Pages
In the basic settings of this theme, we disabled the comment feature on single/static pages because we judged it to be not very important and needed on a page. But if you want to try it you can change some of the code below according to the example:
<b:tag class='pCmnts' cond='data:post.allowComments and data:view.isPost and !data:view.isPreview' id='comment' name='div'> <b:tag class='pCmnts' cond='data:post.allowComments and data:view.isSingleItem and !data:view.isPreview' id='comment' name='div'> <b:include cond='data:post.allowComments and data:view.isPost and !data:view.isPreview' data='post' name='threadedComments-modifV3'/> <b:include cond='data:post.allowComments and data:view.isSingleItem and !data:view.isPreview' data='post' name='threadedComments-modifV3'/> Adding Active Link in Blogger Profile
In the latest update you can directly add a link to the Blogger profile description, for example you can see in the admin profile on the demo blog.
- In Blogger settings, scroll down until you find the User Profile link,
- Click the link you will be directed to a new page,
- scroll down until you find the Introduce Yourself column,
- Fill in your profile description in that column,
- if you want to add a link copy the code below to your profile description.
<a href='https://www.your_domain.com'>your_domain.com</a> - Click Save.
Activating Dark Mode Permanently
You may want to permanently use dark mode and make light mode an alternative, this may be a little difficult but you can implement this by changing some of your blog's HTML code.
The first step is to add the code below after the <body> tag:
<b:class name='drK'/> The next step we have marked some parts of the code that you need to change along with examples, your task is just to find some code that has been marked below (the code is placed separately in some parts of the blog's HTML):
document.querySelector('#mainCont').classList.add('drK') : document.querySelector('#mainCont').classList.remove('drK') document.querySelector('#mainCont').classList.remove('drK') : document.querySelector('#mainCont').classList.add('drK') document.querySelector("#mainCont").classList.add("drK"):document.querySelector("#mainCont").classList.remove("drK") document.querySelector("#mainCont").classList.remove("drK"):document.querySelector("#mainCont").classList.add("drK") Disabling LoadMore Button
The LoadMore button is used to replace Blogger's default navigation buttons. Besides being simpler, this button can also be used directly without having to reload the page to view the next article.
However, you can still disable this function by finding and removing the code below:
<!--[ Load More - Delete this section if you want to disable this feature ]-->
<b:include cond='data:view.isHomepage or data:view.url == data:blog.homepageUrl.canonical path "search"' name='post-paginationMore'/> <!--[ Load More - Delete this section if you want to disable this feature ]-->
<!--<b:include cond='data:view.isHomepage or data:view.url == data:blog.homepageUrl.canonical path "search"' name='post-paginationMore'/>-->