


Widget Blog
Some guidelines for Blog Widgets or post settings, such as some custom post modes found in certain templates, activating the Dark Mode feature permanently etc.
Using FullPage Features
The Fullpage feature can be used to change the post layout or appearance of the page by removing sidebar element which aims to provide more space so that blog readers/visitors can focus more on the content.
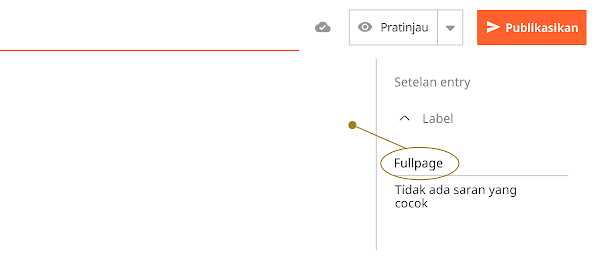
To use it, simply add the 'Fullpage' label to your post as shown in the image below:
Of course, you can also change the label name above with another name as you wish. To do this you have to edit the HTML template first, you can find a code like this in your template and change the highlighted part:
"Fullpage"
Hint:
There's more than one of the above code in the template that you have to change all of them, use the find and replace feature to instantp editing by pressing ctrl + shift + R in the template HTML editor.
Using Sponsored Pages
Sponsored Page allows you to add paid posts (advertisements/reviews) for certain products on your blog, in this mode the author information will not be displayed.
Just like the previous feature, to use the Sponsored page you must add 'Sponsored' label in the post you want. The label name can also be changed, you can find and replace some codes as below:
"Sponsored"
Using Product Pages
The Product page is only available for Median UI template, you can see an example of how it looks here. In addition to adding 'Product' label in the post, we have also provided a post template in the product bundle which you should use for this page mode:
- Open the 'Post and Pages' folder in Google Drive,
- find the file named
Product Post.txt - copy all existing code,
- in Blogger post editor, switch to HTML mode by clicking icon and then selecting HTML View
- Paste all the code that was copied earlier into the post.
- Edit and add supporting media such as name, product image and price list before saving your post.
The label name can also be changed, you just need to find and replace some code as below:
"Product"
Activating Dark Mode Permanently
You may want to permanently use dark mode and make light mode an alternative, this may be a little difficult but you can implement this by changing some of your blog's HTML code.
The first step is to add the code below after the <body> tag:
<b:class name='drK'/> The next step we have marked some parts of the code that you need to change along with examples, your task is just to find some code that has been marked below (the code is placed separately in some parts of the blog's HTML):
document.querySelector('#mainCont').classList.add('drK') : document.querySelector('#mainCont').classList.remove('drK') document.querySelector('#mainCont').classList.remove('drK') : document.querySelector('#mainCont').classList.add('drK') document.querySelector("#mainCont").classList.add("drK"):document.querySelector("#mainCont").classList.remove("drK") document.querySelector("#mainCont").classList.remove("drK"):document.querySelector("#mainCont").classList.add("drK") Changing the Maximum Number of Lines in Post Title and Snippet
We limit the maximum number of lines for post titles with a limit of 3 lines and summary/snippets of posts with a limit of 2 lines on the home page, posts with long titles may be truncated. If you don't want this to happen, replace the CSS code marked below:
.aTtl a, .pSnpt{color:inherit; display:-webkit-box;-webkit-line-clamp:3; ... }

.pSnpt{-webkit-line-clamp:2; ... } - Change the numbers
3and2in the code above to determine the maximum line limit, - Change
display:-webkit-box;bedisplay:block;to disable the max row limit.
Post Timestamp Format
Post timestamp writing is set by default with MMM d, y format, you can't change this format via Layout or Blogger Settings.
We've done our research and determined this format is the most concise and easy for readers to understand, if you don't like this format the only way to change it is to edit your HTML template.
Before that, please study the date format in HTML on the page: unicode.org
Next in the HTML template, please look for the code MMM d, y, MMMM d, y, MMM d, YYYY, MMMM d, YYYY. Each template may have a different code, so look for one of those codes. An example of complete writing in an HTML template is like this:
<time class='aTtmp pTtmp pbl' expr:data-text='format(data:post.date, "MMM d, y")' expr:datetime='data:post.date.iso8601' expr:title='"Published: " + data:post.date format "MMMM d, y"'/> Hide the Image Caption in Post Summary (Snippet)
To hide image captions in post snippets, you must find and change the code below as in the example:
<b:includable id='postEntrySnippet'>
  <b:eval expr='snippet(data:post.snippets.long, {length: 150, links: false, linebreaks: false})'/>
  <!--<b:eval expr='snippet(data:post.body, {length: 90, links: false, linebreaks: false})'/>-->
</b:includable> <b:includable id='postEntrySnippet'>
<!--<b:eval expr='snippet(data:post.snippets.long, {length: 150, links: false, linebreaks: false})'/>-->
<b:eval expr='snippet(data:post.body, {length: 90, links: false, linebreaks: false})'/>
</b:includable> It should be noted that changing the code above will also result in certain tags being read in the post snippet. You may encounter an Inaligned Post Listing Display error when using this feature.
Disable Post Update Date
In our theme the post date will automatically change based on the last date the post was updated, this is important to notify readers that the article they are reading is not outdated.
We don't understand if anyone wants to remove this feature on their blog, but here's the code that must be changed to disable this feature:
<b:includable id='postTimestamps'>
<b:if cond='data:post.lastUpdated != data:post.date'>
<time class='aTtmp pTtmp upd' data-date='Updated:' expr:data-text='format(data:post.lastUpdated, "MMMM d, YYYY")' expr:data-time='format(data:post.lastUpdated, "MMM d, YYYY")' expr:datetime='data:post.lastUpdated.iso8601' expr:title='"Last updated: " + data:post.lastUpdated format "MMMM d, YYYY"'/>
<b:else/>
<time class='aTtmp pTtmp pbl' expr:data-text='format(data:post.date, "MMMM d, YYYY")' expr:data-time='format(data:post.lastUpdated, "MMM d, YYYY")' expr:datetime='data:post.date.iso8601' expr:title='"Published: " + data:post.date format "MMMM d, YYYY"'/>
</b:if>
</b:includable> <b:includable id='postTimestamps'>
<time class='aTtmp pTtmp pbl' expr:data-text='format(data:post.date, "MMMM d, YYYY")' expr:data-time='format(data:post.lastUpdated, "MMM d, YYYY")' expr:datetime='data:post.date.iso8601' expr:title='"Published: " + data:post.date format "MMMM d, YYYY"'/>
</b:includable> Disable Reading Time Feature
The Reading Time feature functions to determine the estimated time spent reading the entire article, the time displayed automatically changes according to the length or number of characters in an article.
However, you can also disable this feature by removing the code as below:
<!--[ Reading time ]-->
<div class='pRd pIn'><bdi id='rdTime'/></div> <script>/*<![CDATA[*/ function get_text(el) { ... maincount = Math.round(counted); document.getElementById('rdTime').innerHTML = maincount + ' min read'; /*]]>*/</script> Disable Description Under Post Title
This description will automatically appear if the search description on post is enabled, this description will also appear in search results later. Disabling or hiding this feature will not remove the post description from search results.
Find and delete the code below to hide this feature:
<!-- Post Description -->
<div class='pDesc'><data:blog.metaDescription/></div>
Changing the Layout of Related Posts Widget
The Related Articles feature is available in 4 different styles, by default the style used in the initial setting is style number 4, you can change it by changing the numbers marked in the code below:
// Change the related post style, there are 4 styles available
widgetStyle: 4,
Disable Pop-ups (Sticky) and Show/Hide Buttons in Comments
We provide 3 alternative styles for Blogger comments, you can choose to keep the floating style or use a simple view.
To disable the floating comment feature, please find and delete or disable the tag below by adding comment <!-- and --> tags.
<!--[ Delete tag below to disable Pop-up comments ]-->
<b:class name='cmBr fixL'/>
<!--[ Delete tag below to disable Pop-up comments ]-->
<!--<b:class name='cmBr fixL'/>--> You can also use a simple comment view without the show/hide button by disabling the following tag:
<!--[ Delete tag below to disable show/hide comment ]-->
<b:include cond='data:post.allowComments' name='post-commentButton'/>
<!--[ Delete tag below to disable show/hide comment ]-->
<!--<b:include cond='data:post.allowComments' name='post-commentButton'/>--> Widget Label
Determining the Number of Labels That Appear First
The default setting of the Label widget on all themes will only show 6 labels and hide the others with show/hide toggle function, this rule applies to labels with Cloud or List style.
To change this setting or disable the show/hide function on labels, you can follow this guide:
- On Blogger dashboard, click Themes,
- click icon on the Customize button,
- click Edit HTML, you will be redirected to the editing page,
- click icon and find widget with the name Label00 as in the image below:


<b:includable id='cloud'>
...
<!--[ Only show 6 label ]-->
<b:if cond='data:tags <= 5'>
...
</b:if>
<!--[ Hide another label from 7th list ]-->
<b:if cond='data:tags == 6'>
...
...
...
<!--[ Show label from 7th list ]-->
<b:if cond='data:alltags >= 6'>
...
...
...
</b:if>
...
...
<label aria-label='Show labels' class='lbM' expr:data-hide='data:messages.showLess' expr:data-show='data:messages.showMore' expr:data-text='"(+" + (data:labels.length - 6) + ")"' for='lbAl-1'/>
...
...
...
</b:includable> <b:includable id='list'>
<ul>
...
<!--[ Only show 6 label ]-->
<b:if cond='data:tags <= 5'>
...
</b:if>
...
</ul>
...
<!--[ Hide another label from 7th list ]-->
<b:if cond='data:tags == 6'>
...
...
...
<!--[ Show label from 7th list ]-->
<b:if cond='data:alltags >= 6'>
...
</b:if>
...
...
<label aria-label='Show labels' class='lbM' expr:data-hide='data:messages.showLess' expr:data-show='data:messages.showMore' expr:data-text='"(+" + (data:labels.length - 6) + ")"' for='lbAl-2' role='button'/>
...
</b:if>
...
</b:includable> - The loop command in Blogger starts at 0.
<b:if cond='data:tags <= 5'>— Main code to limit displaying only the first 6 labels.<b:if cond='data:tags == 6'>— Display toggle show/hide function on looping or 7th label sequence.<b:if cond='data:alltags >= 6'>— Displays the remaining labels from the 7th order onwards.(data:labels.length - 6)— Counting the total number of labels minus 6.
Show All Labels or Disable 'Show more/Show less' Features'
In order to disable this feature there are several codes that you must remove, to be precise the code marked in the color block below:
<b:includable id='cloud'>
...
<!--[ Only show 6 label ]-->
<b:if cond='data:tags <= 5'>
<div class='lbSz'>
<b:class expr:name='"s-" + data:label.cssSize'/>
<b:tag class='lbN' expr:name='data:blog.url != data:label.url ? "a" : "div"'>
...
</b:tag>
</div>
</b:if>
<!--[ Hide another label from 7th list ]-->
<b:if cond='data:tags == 6'>
...
</b:if>
...
</b:includable> <b:includable id='list'>
...
...
<!--[ Only show 6 label ]-->
<b:if cond='data:tags <= 5'>
<li>
<b:tag class='lbN' expr:name='data:blog.url != data:label.url ? "a" : "div"'>
...
</b:tag>
</li>
</b:if>
...
...
<b:loop index='tags' values='data:labels' var='label'>
<!--[ Hide another label from 7th list ]-->
<b:if cond='data:tags == 6'>
...
</b:if>
</b:loop>
</b:includable> Only delete marked codes.
Changing 'Show more/Show less' Sentence on the Label Widget
<label aria-label='Show labels' class='lbM' expr:data-hide='data:messages.showLess' expr:data-show='data:messages.showMore' expr:data-text='"(+" + (data:labels.length - 6) + ")"'/> We use the default Blogger data:messages sentence which will change according to the language selected in the Blogger settings, the marked part of the code above is the code you have to change.
expr:data-hide='data:messages.showLess'— Change todata-hide='Sembunyikan'expr:data-show='data:messages.showMore'— Change todata-show='Tampilkan yang lain'
Adding Color Blocks to List Mode Labels
In the latest version now you can change the style of the Label List widget, there are 2 styles available, to try it find the code below:
<!--[ delete the comment tag below if you want to change style Label List ]-->
<b:class name='bg'/>
Remove or disable the code above with the comment tag <!-- --> to change the style of Label List widget.
...
Widget Profile
Enable/Disable Link To Blogger Profile Page
Profile widgets in Blogger are divided into 2 types: Individual Profile widgets and Team Profile widgets. If there's only one admin or author on the blog, the Individual Profile will be displayed. If there is more than one author, the Team Profile will be displayed.
In the Profile widget, each author's name will automatically be directed to the Blogger profile page, to maintain privacy you can disable this link by changing the code below:
<b:include name='userProfileLink'/> <b:include name='userProfileNameOnly'/> Widget Slider
Recommended Image Size
1920px * 780px is the best size we recommend for maximum image quality and responsiveness on all screen sizes.
Is it possible to increase the number slider?
For now the images that can be displayed are limited to only 4 images, you can't add more than this.
Hide Slider Widget
You can hide this widget directly from Blogger Layout, there are 4 widgets that you have to hide to disable the slider completely.
- On the Blogger dashboard, click Layout,
- You will find a slider-widget containing 4 widgets: Slider Image 01, Slider Image 02, Slider Image 03, Slider Image 04. Look at the image below:
- Click on the widgets one by one and then disable them by pressing the switch button on 'Show this widget'.
